Wednesday, March 16, 2011

Shrimp Speaks: Hi Ho, Hi Ho-It's off to sew I go......


Hey all! I know you have been reading this blog and maybe even been somewhat amused but thinking to yourself-what's the REAL story! Well, luckily I'm here to give it to you!

After many Wednesdays spent over at Anna's looking at all the cute stuff on Etsy.com (a website where people sell all kinds of crafty stuff they make) and lots of other outfits on various sites, I thought to myself-why pay for an outfit that we can make ourselves? And especially since we can make something WAAAAYYY cuter than any of the crap we've seen from these sites! To be completely honest I was thinking that Anna could very easily make the outfits and I could just be a consultant! We went out and bought some plain pants and shirts and lots of really cute fabric and set to work. And when I say set to work I really mean that we spent several weeks looking at it all and doing even more internet "research". I also never thought I would be doing so much of the actual "sewing". So far that hasn't worked out so good for me. I keep hoping every time I leave, that a kind elf would take pity on me and do some work on Echo's outfit but those lazy bastards haven't done anything so far!

After today I do feel like I am finally making some progress and getting closer to a finished project. My goal is to have it all sewn-nothing hot glued here baby! There have been some rough patches, but I have to give Anna something to write about and to also make her look good. I'll let you be the judge when they are both done! I only hope one day that Echo and Mary will look back on these homemade outfits with the same fondness and appreciation that me, Abby (our other sister) & our cousins Matt & Tommy have for some of the wonderful outfits our moms & aunt made for us when we were kids. Just check out this pic and you'll see that sewing is obviously in our blood! Luckily for Anna & our cousin Erin, sewing was out of the blood and Mom had moved on to bigger & better hobbies (like grave rubbing) by the time they came around.

Tuesday, March 15, 2011

Birthday Outfit Update #3: Sew, monkey, sew!

After Shrimp left last Wednesday, I found it physically impossible to not continue to work on the birthday outfits. As you know by now, I am sewing the outfit for baby Mary since Abby lives out of town and Shrimp is making Echo's outfit. So my goal is to finish up Mary's outfit so that Shrimp has a working model to use so Echo's will look somewhat good-ish. I know it's not a real word but it just seems to work here. By the way, Shrimp and I have decided that we would have our own 'challenge', like they do on Project Runway. We are going to use every single piece of fabric that we bought on both these outfits. Will the outfits weigh 10 lbs each and render the girls unable to walk? Maybe. Most likely. Will we have achieved our goal? Yes! And that's what really matters.
 
By making Mary's outfit first, I figure I can make all the mistakes first and warn Shrimp about them before she starts, like not cutting the lace too short before you start like in this picture. I thought it would work out since I'd be adding the ruffles but in the end I had to rig it a little. You'll see.
How cute are these pants? They are so tiny and yet kinda trampy! To do the lace overlay, I didn't do it the correct way, which would have been to take the pants apart completely and then re-sew them with the lace. Instead, I just sewed the lace right on top with the edges tucked under so there's no raw hem. They ended up looking like teeny chaps.

So now it's ruffle time. I pull the ruffle really tight so it fits on the pant leg, then pin it on right sides together, and sew.
Isn't this adorable?
Then I had to rip it out because I forgot that the black & white is going to be the top ruffle, not the bottom one. See, everyone makes mistakes. I have callouses from my seam ripper. It gets more action than a Playboy owned by a 14 year old boy. So I then just repeated the same with the pink ruffle.

Ta da! Finally, we're off to the right start.

Next, we wanted to add this black lace trim with jewels but it was really skinny so it couldn't be a ruffle on it's own. So to make a base ruffle to sew it onto, I took the pink tulle, folded it over double, and cut out the row and sewed the top and pulled the tails of the thread to get a ruffle. After I got it to the length I needed, I then sewed the black lace right on top at the bottom edge.

After that, I repeated the process with the last layer of ruffles, the black and white print. Hello again!

What I don't have a picture of right now is the other leg; when I finished, there were spots where the lace wasn't long enough to reach the top ruffle. Did I redo it all at that point? Hell no. I added a row of black rick rack to the bottom of the lace on each leg. We're already pretty far gone on these pants, it's not like one more element was going to put it over the top or anything. Check it out in the very last pic.
Here is the left leg finished without the rick rack. I just love how these look like the tiniest hoochie mama pants ever! Look how small they are compared to my hand. Now if only they'd make t-back diapers. Nobody wants a VPL to throw the whole look off.

Time to start the shirts I guess. See what happens? You do all this work on the pants just to have to start all over again with the tops. Okay, here we go.

We decided that for the ruffle surrounding the cameo, we would use alternate fabrics. So Mary's shirt is going to use the black and white fabric and Echo's will use the pink fabric.

The first thing I did was to pin and sew the ruffle in an oval so that when you put the patch on, it'll cover up all the exposed seams.

Then I ironed on the patch over the middle. I need to now work on re-fluffing the ruffle since it's flat as a pancake. I need to ask Erin for some advice of fluffing. Word is she's the expert on the subject.


And this is as far as I've gotten so far. I'm waiting to sew the center seam of the pants up until the last minute in case we need to make any more changes. You can see the rick rack at the bottom of the pants and the bow on the shirt isn't going to stay there; I just pinned it on so I wouldn't lose it. I'm not going to stop until the shirt is just as awesome as the pants! But another day. Maybe the next Shrimp day. What Shrimp lacks in sewing ability she makes up for in creativity. See, she's good for something!


Saturday, March 12, 2011

Birthday Outfit Update #2: The Fabric Whisperer

Fabric Whisperer, don't we wish. We had all the fabric. The machine is out and humming softly, like it's saying under it's breath, "Pack it up now bimbos; we both know you can't make squat". And we were stumped. We even used the tried and true method of picking up the fabric, rubbing it against our faces, and saying to it in a super-fake Spanish (it could have been French, it was really bad) accent, "Fabric, speak to me! Tell me what you want me to do with you! What do you want to become?" We stopped short of spreading it all over the floor and rolling in it. It's funny how they don't like when you do this at Jo-Ann Fabrics. Whatever, bitches! We needed some inspiration!

By the way, Shrimp said the fabric spoke to her and told her I should do all the sewing. Damn mouthy fabric.

After last Wednesday, all I'd managed to do is finish taking out the seams in baby Mary's pants but that's as far as I got. But I knew that this Wednesday, or "Shrimp Day", we would have to put some major effort into these outfits if we want them to actually be worn for this year's birthday party. Well, and not just worn, but stay semi-put together. We have this vision of the girls going down the slide at their party and pieces of the outfits flying off like beads at a Mardi Gras parade after the underage girls oops, lost their tops! So I got up early- we're talking like 8 am- and got some work done before my real job.


I thought we weren't going to get anywhere unless we started playing with the fabric so I set out to make ruffles. I didn't know what we were going to do with them yet but I knew they'd get used. I picked what I thought would be a good width using the common professional sewing method of 'who-the-f*-knows-ology' and then folded it back and forth so I'd have 4 strips of the same width. At this point , your iron is your friend. That is not a phrase you will ever hear me say outside of the sphere of sewing. But in sewing, it makes things so much easier if you have nice crisp creases to use as cutting guides. I repeated the same with the pink fabric and then cut them out so I ended up with 4 strips of each fabric.


That was pretty much all I'd finished before I had to start working so when Shrimp got here, I put her on ruffle duty. Here she is, slaving away. It took her like 10 minutes to thread the needle.


We first ironed over a tiny bit of the edge and sewed hems on all of them using an over lock stitch with hot pink thread. Then we changed our stitch length to the longest possible and sewed at the top of the unfinished edge and using the tails of the string, we gathered the fabric until we had the ruffles the length we thought we needed.


Shrimp figured any extra we had could be made into a bikini top because hey, those bounce houses get kinda hot! And when I say bounce houses, that's not a nickname for her boobs. I mean the bounce house where they'll have the party. Although I'm sure all the dads would enjoy the show. It might be the first time we get to make money off of a kid's birthday party- dads, bring your singles! We don't take coupons.


Then we decided to just go for it and start with the pants.


We want them to be capri pant length so I cut 3 inches off Mary's pants first. I cut an extra inch off after this picture. And you know my feeling about the difference an inch can make...
We opened the pants up by taking out the inseam so that we could sew on what we needed to and then just sew them back up at the end. Taking the seams out of the sides would not have worked for this project. Then as we were trying to figure out how we were going to try to use the lace, we put it over the pants and said, "Holy crap, that's so tacky! It is ON!"


Hot cha cha! We were trying to figure out what order we'd put the ruffles in at the bottom of the pants and came up with this-


Can't you just hear the Macarena in the background? They are going to look like either little Latin dancers or court jesters. But they will be adorable! If you can't get away with this stuff when you're 2 & 3, then when else are you going to do it? Unless you want to end up on the 'People of Wal-Mart' website, which isn't really a bad life goal. Hey, it's something!

For the shirts, we're thinking of surrounding the cameos with a ruffle and then doing a lace band around the waist to kind of look like a belt with a bow in the pink fabric.


This was as far as we got on Wednesday. Now comes the fun part- construction. Check back to see how that goes. It should be funny since Shrimp is a little, um, 'rusty' (super sucky) on the sewing machine. I told her I was going to have a sewing class called 'The Extra Critical Instuctor' since all I pretty much did was stand over her shoulder and go "Are you STILL threading that needle?" or "You do know that you can press on the pedal to make it go faster, right?" or maybe a few "Yeah, that's great- if you meant for it to look like that." Can't you see why she loves hanging out over here so much?

Oh, and I promised Shrimp I would put in a 'Shrimp Speaks' section in my blogs so that she could give her side of the story, which will probably be delusional but should make for good reading!

Friday, March 11, 2011

Crack Coats- Phase 2: Children of the Corn

There's really no reason for the Children of the Corn reference except for the fact the next 3 coats I made were all for kids and I wanted to make the kids sound crazy instead of myself for a change. Did it work? Do you have a vision of nutso kids in your head and not a nutso chick with a sewing machine? Good, let's move on.


After making baby Mary's coat, I decided to make a coat for my best friend's daughter, Julia. She was 18 months at the time and Colleen, my BFF (yo Rough!), had sent me this really cool cotton fabric from Etsy just so that I could experiment with it. So tempted to make an experiment joke right now but will show self-restraint....Anyway, I just loved this fabric and didn't want to wait until the spring to make another little dress, so I thought, why not make a coat out of it? Alright, alright, I didn't come up with this on my own. When I need inspiration, I browse Etsy. On there I saw some really cute coats in bright cotton prints so that's what led me to try this out.


Like baby Mary's coat, this pattern was very simple as well. It was actually from a layette pattern that I already had but it didn't matter, I just needed the shell. Unfortunately I can't find the pattern to share but it was a retro pattern from the 1950's. For the lining, I used a North Face fleece that was too tight for me and just for a little extra warmth, I sandwiched in another layer of fleece in the body part only. I wanted her to be able to bend her little arms so I didn't do a double lining in the arms. 

Once I was finished, I found some fabric left over from baby Mary's nursery set from Satan and made a few ruffles for the bottom of the coat and for a cute little butt ruffle. I alternated fabrics for the ruffles on the butt and they looked so dang cute I could have crapped my pants. You may want to pre-crap your pants before you look at the pics, because for this coat, I made the MATCHING HAT! Go ahead, crap away. 


In the midst of all this girly stuff I was sewing, my little nephew Jett was asking me when Aunt Anna was going to make something for him. Now, this kid is so cute that everybody wants to steal him. So how could I not make something for him? I found this Spiderman fabric at JoAnn's, bought some really soft dark blue flannel for the lining, and used this pattern:

I know, I know, it's a girl's pattern. But there are very few patterns for boys that don't involve super  dorky matching father-son rope ties. Jett was almost 4 at the time so size-wise, this pattern worked perfectly for him. This is probably one of the few things that I have ever made start to finish in a day. I love using zippers. They are so much easier than buttons. The only thing I would have added to this coat is a little tab at the top of the neck to secure the zipper closed. It just looked like it should have closed a little more to keep the wind out. 


The last coat I'm going to show you is the most elaborate of this post: The Echo. Echo's coat had to be like her personality; totally unique and super colorful. I found these 2 fabrics at Ikea of all places. I liked the heavy weight cotton for warmth but it ended up being hard to handle at some times as well. I chose a pattern from Daisy Kingdom but obviously did not use fake fur, like the cover picture:

I don't like these patterns. I had already bought another one for another coat so I was stuck with it, but I wouldn't use it again. And it's all because of the rascally neckline! I just wanted to use that word. In reality, that neckline made me it's bitch. So much that I made the coat all the way up to the collar then put it away until I could do some research. I found no help in the end, so I just kept sewing and hoped for the best. The change I made to this pattern was that the back was open, kind of like a pair of curtains swagged to the sides. I edged the coat with the contrasting fabric, although it was too thick to ruffle in the normal way so I ended up hand pinning all the ruffles in place with about a billion pins. Where it opened up in the back, I sewed on alternating fabric ruffles right onto the liner. It came out cute, but for some reason it was not exactly what I had in mind. And of course, I made the matching hat. Hats are really easy, by the way. And if you have a problem with the neckline, send me a message and I'll try to help out by providing all the cuss words I used while working it out myself.

I had thought this coat would be huge on Echo but as it turns out, the sleeves were almost too short. The red ruffle you see on the cuffs was sewn on later to extend the length an inch.

For this coat, I used regular metal snaps attached to the lining of the coat. The entire coat was lined with this red fabric that was really soft but still kind of slippery. Abby had told me that the only problem with baby Mary's coat being lined with flannel was that it didn't slide against other fabrics so getting baby arms into the coat was like threading wet noodles into a straw. So if nothing else, line at least the arms with something silky.


Tune in soon for Crack Coats- Phase 3 and see my mom's beautiful coat and my niece Gaby's coat that was so rocking, you will be sewing up your own leg warmers before you know what hit you. 

Wednesday, March 9, 2011

Crack Coats- Phase 1: The First Taste is Free

So crack coats. This refers to the amount of crack I was smoking when I went on the coat craze. I guess I could call the blogs 'Coat Craze', but that's no fun. It's funny how so far, my blogs involve either drinking or illegal drugs (okay, I didn't actually take the drugs) but looking back on some of these things, it's really the only reason I could see for making 7 coats in a row. 'In a row' might be an overstatement; it's not like I churned them out like a Chinese orphanage after a new Nike style hits the market, but it takes me weeks of staring into space before I can start a project. You know, get the creative juices flowing, waiting for the next shipment of crack to hit the streets, things like that.


I guess I'm short bus slow in a way though, because once I learn how to do something, I don't then move on and try something new. I tend to turn into this born-again Christian zealot, except replace 'Jesus' with 'McCall's' or 'Simplicity'. So here was the first taste of the crack, that high that kept me coming back for more. It was the baby coat. It really wasn't fair; what doesn't look super adorable in miniature? Except, well, you know....heh heh heh.


When you think coats, I bet you don't think 'easy'. When I say 'my cousin Erin', you probably think easy. But shocker of all shockers, coats were way easier than I had ever thought they'd be. Seriously, it's not the crack talking! Especially this coat for baby Mary. Here is the pattern:


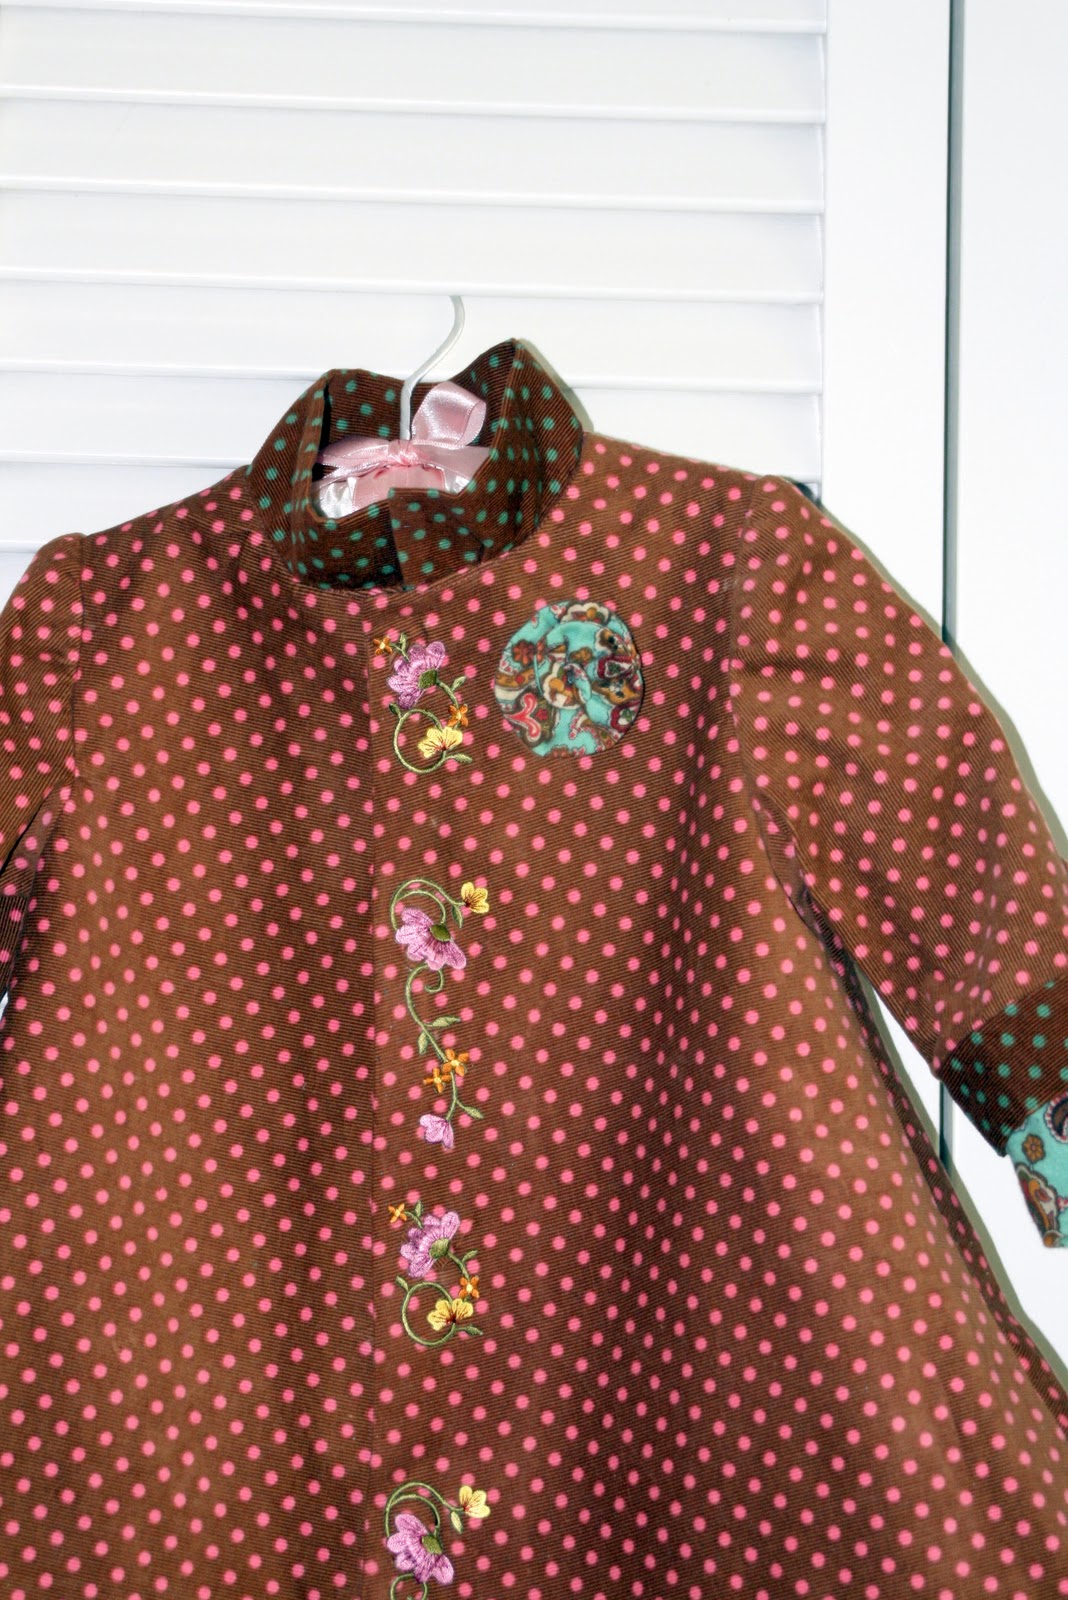
For the material, I had bought this lightweight corduroy material when the baby was born for both Abby and baby Mary, I just never knew what to make with them. Now that she was 18 months and walking and fall was approaching, I figured I'd make some lightweight coats for the two of them. Baby Mary's coat was made of the brown with pink polka dot fabric and lined with the teal paisley flannel. I used coordinating fabric from Abby's coat that was brown with green polka dots for accent and then finished it with an iron-on applique to cover up the snaps down the front. 
The coat came together very quickly. Just think of the pieces that go into a coat; the 2 front pieces, back piece, sleeves, and collar. That's it! It's like the old Rice Crispies commercial where the mom would read a book in the kitchen for an hour and then throw some flour on her face and act like she'd been cooking for hours. That's how coats are- so easy you have to act like they're a lot of work to get the respect you crave. I got the body together quickly and then made a duplicate with the lining, turned it inside out, and then hand sewed the lining into the coat. On something that small, it didn't take that long and I did it while watching tv at night. For the buttons, I used magnetized snaps that are used for purses. They are a lot cheaper in the purse department than the sewing notion department. But they are not attractive because they are made to attach to the lining only so I needed a way to cover them up. I thought about flowers, bigger buttons, or another ruffle, but ultimately ended up finding these iron-on appliques that I loved. They seemed kind of bright at first, but once they were ironed on, they seemed to blend into the fabric and look more like it was embroidered instead of just ironed on. I didn't make the hat this time but I did in the next two girls' coats so stay tuned for some coats so cute they'll make you puke. Seriously, you'll need a bucket.


For Abby's coat, I used this pattern:


For accent, I used the same paisley flannel and some of the fabric from baby Mary's coat but also added in a turquoise satin for the lining and other embellishments. Once I had finished the basic coat, I had thought of doing 3 layers of ruffles going down the front and around the bottom like I had seen on this magazine cover:


But once I had it pinned on, it weighed so much that it made the jacket pull to one side and it didn't really have a whole lot of shape to it. Shrimp came over to try it on since they both have super-sized fun bags so we could see how it hung on a real person, not just the dress form. Shrimp agreed that it needed something to break up the 'boob mound' and nixed the ruffles. Instead, we took the fabric from the paisley ruffle, turned it into a belt, and then made some fabric rosettes to stagger along the bottom of the coat.


I LOVED this when it was finished. I gave some serious consideration to keeping it for myself and getting one of those fake babies to wear the coat since it was too small for my dog. But alas, I packed up these puppies and sent them off to Maine.


The baby coat was still a little long for Mary since she is so teeny but Abby's coat seems to fit her well. The 'what not to do next time' thing I learned from making Abby's coat was to not sew down the inside lining to the bottom of the coat. I spent a lot of time sewing Abby's liner in and there are a few spots in the coat where it seemed like the lining pulled and caused the coat to pull under. Getting the length of the lining to match the length of the coat was almost impossible so in my next jackets, I just didn't do it. I hemmed the outer shell, then hemmed the lining, and attached the lining everywhere except the bottom. It worked out great with none of the pulling that I saw in Abby's coats. But check these two out; so fricking cute!


You kind of hate them a little for being so perfect, right? We're okay with that. We like being so cute people kinda hate us. What girl doesn't? If you answered 'me', then you've probably never inspired that feeling in others before. I hope you're good at math because life will be hard for you, my friend. Good luck on the coats! If anything, they can distract people from your face if needed! 


Monday, March 7, 2011

Sew what's next?

Okay, even though I said I was going to post all of my former projects before starting a new one, I lied. It happens a lot. But in this case, I actually wanted to show you the 'before' pics so that I can post as I go and you can follow the project along.

Oh, and remember how I said I live and breathe patterns? Apparently I lied about that too! Or in situations like this, you don't need a pattern, which for me makes it much harder. I like having a concrete idea of what I want before I start. I can always change the details at the very end but this is all about the add-ons. Here's the scoop: both of my nieces have birthdays coming up and they are having a joint birthday party. Like, together, not with a bunch of joints (sweet 16, perhaps?). So Shrimp and I are going to make them coordinating birthday outfits for the party. Shrimp went and bought plain white t-shirts and bright pink cotton pants to start with:

They look like a coral colour in the picture but they are more hot pink in real life. After spending many a Wednesdays (Shrimp's day off so she hangs out here part of the day) scrolling through Etsy and other websites for inspiration, we tentatively decided on a thong bikini theme. Then we thought we needed a theme for the girls' outfits, so we thought ooh la la, how about french? So we set out to look for some coordinating black, white, and pink fabrics. We found a bunch of stuff we liked online, but we wanted to see it in person and we're too cheap to pay for the shipping, so once again we did a tour of the local fabric shops.

What we eventually found is not exactly french, but it's the colour scheme we were looking for. Here's what we got:


So we have the black & white harlequin print, the pink/hot pink scroll print, shiny hot pink tulle, black lace, and for trim we have black lace with rhinestones, the girl profile appliques, and black bows. We don't think we're going to do the outfits exactly the same, but we are still working out the details. We just know there will be lots and lots of ruffles. Since Shrimp's left the stuff at my house, she's given me permission to start on baby Mary's outfit because honestly, I've got to actually start putting some stuff together to see what will work and what won't. I'm guessing that I'll have Mary's outfit all finished and Shrimp's kid will have hers hot-glued on the day of the party. I'm just saying, she's got a lot of great ideas but a ball of productivity she ain't!

While I'm confessing today, I have one more. For the last month, I have been so burnt out on sewing that I completely stopped and put everything away. I had made coats for my sister, two of my nieces, my nephew, and my mother over the winter and I was so burnt out. Which really sucked for my sister-in-law since her coat was the only one I didn't finish but I promise, it'll be first on the list next fall! So doing these outfits with Shrimp for my nieces will hopefully be the catalyst that I needed to spark the interest again.

Luckily, I have a wonderful mother-in-law who recently sent me a bag of fabric, buttons, and zippers, and looking through it all has made me start to want to make something. I just don't know what yet. I have really been wanting to try to make a bikini but I might start off by modifying some that I already have that I really love but don't like the fit (I hate string bikinis- if I wanted a wedgie all the time I'd wear a t-back). I really think undergarments might be my next step. And don't worry, I'll make sure Bobby shaves his man-gina before modeling any of the finished goods!